Introducing Baby Yoda, a PAL to help you relax while traveling!
Ideation to Showcase: Nov. 5th - Nov. 30th 2022
baby yoda's capabilities
Check out this video showing how Baby Yoda can help you relax!
Project Requirements
For this project, we were asked to design a PAL (Personal Animatronic Lifeform) to provide therapeutic support and calm nerves for people who are nervous when flying on airplanes. Below we summarize the project requirements.
Interaction Requirements:
Interaction should last around 60 seconds
Progress towards the final relaxation state should be indicated
Three distinct interactions and responses should be included
A visual indication of reaching the relaxation or "Nirvana" state should be included
Technical Requirements:
The PIC32 microcontroller must be used
At least one analog input and associated output must be implemented
One sensor input must involve non-contact sensing
One feedback action to the user needs to be tactile, haptic, or audio
Dimension constraints are 50 cm x 50 cm x 100 cm
Functionality Description
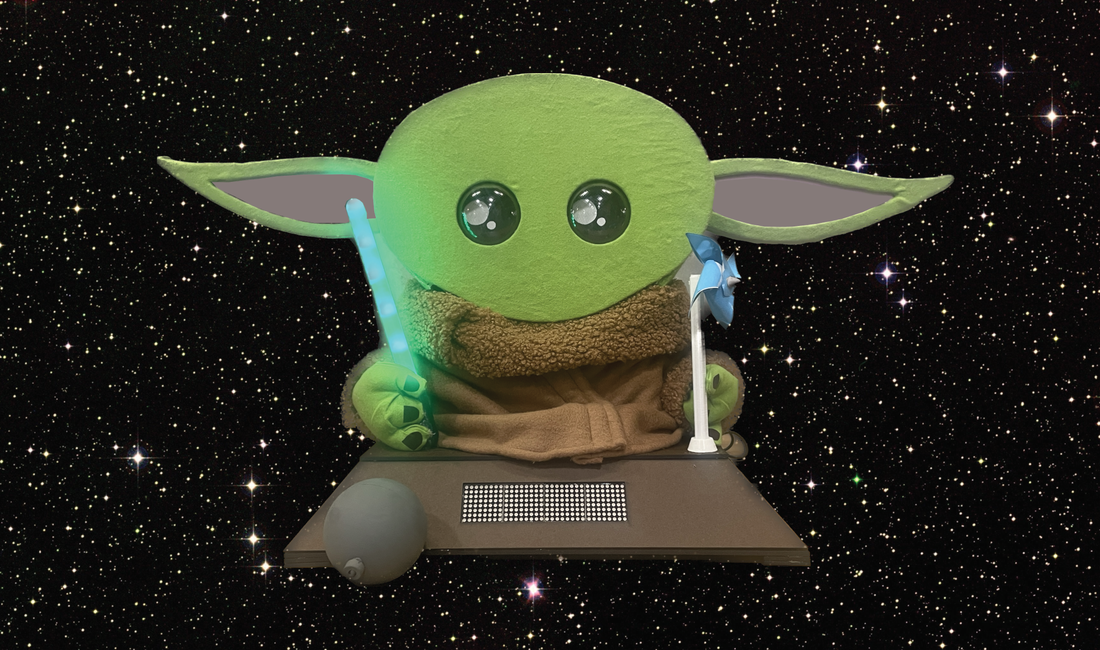
Baby Yoda is an interactive, animatronic device. When Baby Yoda is asleep, the user can pat the top of his head to wake him up. When waking up, Baby Yoda opens his eyes, his ears move up and down, and a welcoming message scrolls across his display. The welcoming message reads "Baby Yoda, I Am".
After the welcoming phase, three interactions are available to the user during the interactive mode. The user can pull the toy ball towards them to stretch. This will cause Baby Yoda's ears to move up and down in proportion to the distance stretched. The user can also place their hand on the top of Baby Yoda’s head to experience a haptic, vibrating response. Or the user can blow on the pinwheel to see a positive message scroll across the screen, "Great, You Are".
During interactive mode, Baby Yoda’s eyes slowly close to indicate the passage of time. Each second his eye lids lower, closing fully after 60 seconds. If the user does not complete all tasks within 60 seconds or if they are inactive for 30 seconds, Baby Yoda will go to sleep and the user’s progress will be reset.
After the user completes an interaction, an LED in Baby Yoda’s lightsaber lights up. If each interaction is completed twice, the light saber will be fully lit up, and Baby Yoda will indicate to the user that they have successfully reached a state of relaxation or "Nirvana". In this state, Baby Yoda will wiggle his ears up and down and display a light show on his lightsaber.
At the end of Nirvana or after 30 seconds of user inactivity, Baby Yoda will go back to sleep. The video below show's Baby Yoda's indication of the Nirvana state.
Gems of wisdom (for future me218 students)
Project planning tips:
Carefully scope your project, keeping in mind the time constraints and allowing sufficient time for debugging.
Separate project features into two categories: necessary to meet check off requirements and bonus features. Prioritize the necessary features first.
Acquire a small stock of extra wires, crimps, connectors, and solder so that you never have to pause your work on the project while waiting for these parts.
You don’t have to pull all-nighters or stay up excessively late for this project, start planning and prototyping early.
Electrical tips:
Check the amount of current your circuit is drawing from the PIC. If the PIC is resetting in a seemingly random way, your circuit likely draws too much current from the PIC. Draw from the external power supply instead.
Test your connectors with your breadboard before spending time crimping and soldering all your components.
Test all components after soldering or crimping them before adding them to your project.
Use tape to label your wires. Wires will come out of your breadboard, labeling them makes putting them back easy.
“Flatten” your wires by shortening them on your breadboard when possible. This makes it easier to debug your circuit, add additional components, and prevent wires from unintentionally being pulled out.
Software tips:
Spend time at the beginning of the project making sure everyone on the team understands SourceTree and agree on how you will use it.
Make use of TeraTerm for debugging.
Add debugging print statements within each state or event to see the path taken by the code.
Mechanical tips
Budget twice as much time as you think you need for the mechanical construction.
Plan to build a mechanical prototype - chances are, you will want to change some aspects of your mechanical design after interacting with the prototype.
Complete user testing before the showcase to better understand how people will interact with your robot.
Design your project for easy access to all electrical components for quick debugging.
meet the team - team 5, we are!
(from left to right) Kara Herson, Olivia Tomassetti, Rachel Wallstrom
ME 218A: Smart Product Design Fundamentals, Fall 2022